Management Framework
The management framework provides a Zeek-based, service-oriented architecture
and event-driven APIs to manage a Zeek cluster that monitors live traffic. It
provides a central, stateful controller that relays and orchestrates
cluster management tasks across connected agents. Each agent manages Zeek
processes in its local instance, the Zeek process tree controlled by the
local Zeek Supervisor. A management client
lets the user interact with the controller to initiate cluster management
tasks, such as deployment of cluster configurations, monitoring of
operational aspects, or to restart cluster nodes. The default client is
zeek-client, included in the Zeek distribution.
Quickstart
Run the following (as root) to launch an all-in-one management instance on your system:
# zeek -C -j policy/frameworks/management/controller policy/frameworks/management/agent
The above will stay in the foreground. In a new shell, save the following
content to a file cluster.cfg and adapt the workers’ sniffing interfaces to
your system:
[manager]
role = manager

[logger]
role = logger

[worker-01]
role = worker
interface = lo

[worker-02]
role = worker
interface = eth0
Run the following command (as any user) to deploy the configuration:
$ zeek-client deploy-config cluster.cfg
{
  "errors": [],
  "results": {
    "id": "9befc56c-f7e8-11ec-8626-7c10c94416bb",
    "nodes": {
      "logger": {
        "instance": "agent-testbox",
        "success": true
      },
      "manager": {
        "instance": "agent-testbox",
        "success": true
      },
      "worker-01": {
        "instance": "agent-testbox",
        "success": true
      },
      "worker-02": {
        "instance": "agent-testbox",
        "success": true
      }
    }
  }
}
You are now running a Zeek cluster on your system. Try zeek-client get-nodes
to see more details about the cluster’s current status. (In the above, “testbox”
is the system’s hostname.)
Architecture and Terminology
Controller
The controller forms the central hub of cluster management. It exists once in every installation and runs as a Zeek process solely dedicated to management tasks. It awaits instructions from a management client and communicates with one or more agents to manage their cluster nodes.
All controller communication happens via Broker-based Zeek event exchange, usually in the form of request-response event pairs tagged with a request ID to provide context. The controller is stateful and persists cluster configurations to disk. In a multi-system setup, the controller runs inside a separate, dedicated Zeek instance. In a single-system setup, the controller can run as an additional process in the local instance.
The controller’s API resides in the Management::Controller::API module.
Additional code documentation is here.
Instance
A Zeek instance comprises the set of processes managed by a Zeek Supervisor. The management framework builds heavily on the Supervisor framework and cannot run without it. Typically, a single instance includes all Zeek processes on the local system (a physical machine, a container, etc), but running multiple instances on a system is possible.
Agent
Management agents implement instance-level cluster management tasks. Every instance participating in cluster management runs an agent. Agents peer with the controller to receive instructions (a node restart, say), carry them out, and respond with the outcome. The direction of connection establishment for the peering depends on configuration and can go either way (more on this below); by default, agents connect to the controller.
The agent’s API resides in the Management::Agent::API module.
Additional code documentation is here.
Agents add script-layer code to both the Supervisor (details here) and Zeek cluster nodes (details here) to enable management tasks (e.g. to tap into node stdout/stderr output) and to receive confirmation of successful node startup.
Cluster nodes
The Zeek processes involved in traffic analysis and log output make up the Zeek cluster, via the cluster framework. The management framework does not change the cluster framework, and all of its concepts (the manager, logger(s), workers, etc) apply as before. Cluster nodes refer to individual Zeek processes in the cluster, as managed by the Supervisor.
Client
The management client provides the user’s interface to cluster management. It
allows configuration and deployment of the Zeek cluster, insight into the
running cluster, the ability to restart nodes, etc. The client uses the
controller’s event API to communicate and is the only component in the framework
not (necessarily) implemented in Zeek’s script layer. The Zeek distribution
ships with zeek-client, a command-line client implemented in Python, to
provide management functionality. Users are welcome to implement other clients.
A Visual Example
Consider the following setup, consisting of a single instance, controller, and a
connected zeek-client, all running on different machines:
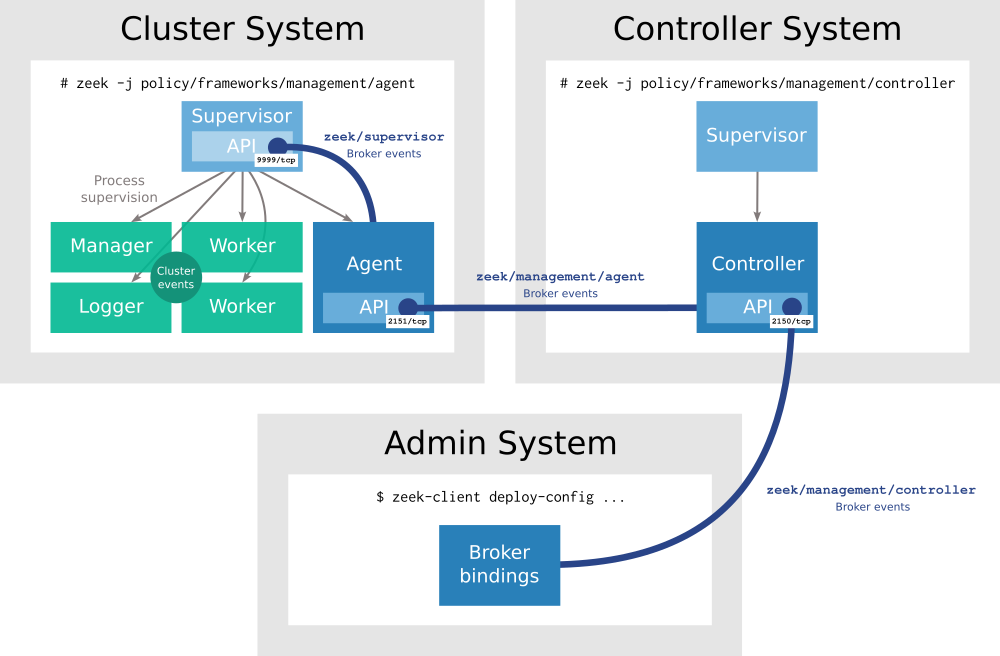
The cluster system runs a single management instance, with an agent listening on
TCP port 2151, the default. Since the agent needs to communicate with the
Supervisor for node management tasks and the two run in separate processes, the
Supervisor listens for Broker peerings, on TCP port 9999 (again, the default),
and the two communicate events over topic zeek/supervisor. As shown, the
agent has launched a 4-node Zeek cluster consisting of two workers, a logger,
and a manager, communicating internally as usual.
The controller system is more straightforward, consisting merely of a
Supervisor-governed management controller. This controller has connected to and
peered with the agent on the cluster system, to relay commands received by the
client via the agent’s API and receive responses over Broker topic
zeek/management/agent. Since the controller doesn’t need to interact with
the Supervisor, the latter doesn’t listen on any ports. Standalone controllers,
as running here, still require a Supervisor, to simplify co-located deployment
of agent and controller in a single instance.
Finally, the admin system doesn’t run Zeek, but has it installed to provide
zeek-client, the CLI for issuing cluster management requests. This client
connects to and peers with the controller, exchanging controller API events over
topic zeek/management/controller. For more details on zeek-client, see
below.
In practice you can simplify the deployment by running zeek-client directly
on the controller machine, or by running agent and controller jointly on a
single system. We cover this in more detail.
Goals and Relationship to ZeekControl
The management framework first shipped in usable form in Zeek 5.0. It will replace the aging ZeekControl over the course of the coming releases. The framework is not compatible with ZeekControl’s approach to cluster management: use one or the other, not both.
The framework currently targets single-instance deployments, i.e., setups in
which traffic monitoring happens on a single system. While the management
framework technically supports clusters spanning multiple monitoring systems,
much of the infrastructure users know from zeekctl (such as the ability to
deploy Zeek scripts and additional configuration) is not yet available in the
management framework.
ZeekControl remains included in the Zeek distribution, and remains the recommended solution for multi-system clusters and those needing rich management capabilities.
Running Controller and Agent
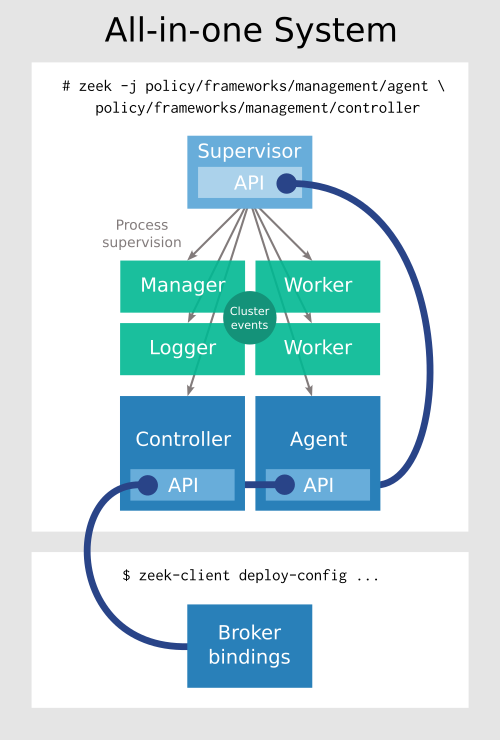
Joint launch
The easiest approach is to run a single Zeek instance in which the Supervisor launches both an agent and the controller. The framework comes pre-configured for this use-case. Its invocation looks as follows:
# zeek -j policy/frameworks/management/controller policy/frameworks/management/agent
The -j flag enables the Supervisor and is required for successful launch of
the framework. (Without it, the above command will simply return.)
Note
If you’re planning to monitor the machine’s own traffic, add the -C flag
to avoid checksum errors, which commonly happen in local monitoring due to
offload of the checksum computation to the NIC.
The following illustrates this setup:
Separate controller and agent instances
You can also separate the agent and controller instances. For this, you’d say
# zeek -j policy/frameworks/management/agent
for the agent, and
# zeek -j policy/frameworks/management/controller
for the controller. You can run the latter as a regular user, assuming the user
has write access to the installation’s spool and log directories (more on this
below). While technically not required to operate a stand-alone controller, the
Supervisor is currently also required in this scenario, so don’t omit the
-j.
This looks as follows:

Controller and agent instances on separate systems
You can also separate the two across different systems, though that approach will only really start to make sense when the framework fully supports running multiple traffic-sniffing instances. To do this, you either need to configure the agent to find the controller, or tell the controller where to find the agent. For the former, redefine the corresponding config setting, for example by saying
redef Management::Agent::controller = [$address="1.2.3.4", $bound_port=21500/tcp];
in local.zeek and then launching
# zeek -j policy/frameworks/management/agent local
The result looks as already covered earlier:
To make the controller connect to remote agents, deploy configurations that include the location of such agents in the configuration. More on this below.
Multiple instances
You can run multiple instances on a single system, but it requires some care. Doing so requires specifying a different listening port for each agent, and additionally providing a different listening port for each instance’s Supervisor. Since agents communicate with their Supervisor to facilitate node management, the Supervisor needs to listen (though only locally). Furthermore, you need to ensure this agent runs with a unique name (see the next section for more on naming).
Assuming you already have an instance running, a launch of an additional agent might look as follows:
# zeek -j policy/frameworks/management/agent \
  Management::Agent::default_port=2152/tcp \
  Management::Agent::name=agent-standby \
  Broker::default_port=10001/tcp
Finally, as already mentioned, you can spread multiple instances across multiple systems to explore distributed cluster management. This simplifies the individual launch invocations, but for practical distributed cluster use you may find the framework’s current cluster management features lacking when compared to ZeekControl.
Controller and agent naming
The management framework identifies all nodes in the system by name, and all
nodes (agent(s), controller, and Zeek cluster nodes) must have unique names. By
default, the framework chooses agent-<hostname> and
controller-<hostname> for agent and controller, respectively. To reconfigure
naming, set the ZEEK_AGENT_NAME / ZEEK_CONTROLLER_NAME environment
variables, or redefine the following:
redef Management::Controller::name = "controller1";
redef Management::Agent::name = "agent1";
Firewalling and encryption
By default, the controller listens for clients and agents on ports 2149/tcp and
2150/tcp. The former port supports Broker’s WebSocket data format, the latter its
traditional one.
Unless you run all components, including the client, on a single system, you’ll
want to open up these ports on the controller’s system. The agent’s default port
is 2151/tcp. It always listens; this allows cluster nodes to connect to it
to send status reports. If the agents connect to the controller, your firewall
may block the agent’s port since host-local connectivity from cluster nodes to
the agent process suffices.
To switch agent and/or controller to different ports, set environment variables
ZEEK_CONTROLLER_PORT / ZEEK_CONTROLLER_WEBSOCKET_PORT / ZEEK_AGENT_PORT,
or use the following:
redef Management::Controller::default_port_websocket = 21490/tcp;
redef Management::Controller::default_port = 21500/tcp;
redef Management::Agent::default_port = 21510/tcp;
By default, agent and controller listen globally. To make them listen on a
specific interface, set environment variables ZEEK_CONTROLLER_ADDR /
ZEEK_CONTROLLER_WEBSOCKET_ADDR / ZEEK_AGENT_ADDR,
or redefine the framework’s fallback default address:
redef Management::default_address = "127.0.0.1";
The framework inherits Broker’s TLS capabilities and defaults. For details, please refer to the Broker config settings.
Note
zeek-client currently doesn’t support client-side certificates.
Additional framework configuration
The framework features a number of additional settings that we cover as needed in the remainder of this chapter. Refer to the following to browse them all:
Node Operation and Outputs
The framework places every Supervisor-created node into its own working
directory, located in $(zeek-config --prefix)/var/lib/nodes/<name>. You can
reconfigure this by setting the ZEEK_MANAGEMENT_STATE_DIR or redefining
Management::state_dir. Doing either will change the toplevel
directory (i.e., replacing the path up to and including var/lib in the
above); the framework will still create the nodes/<name> directory structure
within it.
Outputs in the resulting directory include:
Two separate ad-hoc logs (not structured by Zeek’s logging framework) capturing the node’s stdout and stderr streams. Their naming is configurable, defaulting simply to
stdoutandstderr.Zeek log files prior to log rotation.
Persisted Zeek state, such as Broker-backed tables.
Log Management
The framework configures log rotation and archival via Zeek’s included zeek-archiver tool, as follows:
The
Log::default_rotation_intervalis one hour, with both local and remote logging enabled. You are free to adjust it as needed.The log rotation directory defaults to
$(zeek-config --prefix)/spool/log-queue. To adjust this, redefineLog::default_rotation_diras usual. You can also relocate the spool by setting theZEEK_MANAGEMENT_SPOOL_DIRenvironment variable or redefiningManagement::spool_dir. The framework will placelog-queueinto that new destination.The log rotation callback rotates node-local logs into the log queue, with naming suitable for
zeek-archiver. An example:conn__2022-06-20-10-00-00__2022-06-20-11-00-00__.logFor details, take a look at the implementation in
scripts/policy/frameworks/management/persistence.zeek.Once per log rotation interval, the agent launches log archival to archive rotated logs into the installation’s log directory (
$(zeek-config
--root)/logs
). By default this invokeszeek-archiver, which establishes a datestamp directory in thelogsdirectory and places the compressed logs into it:# cd $(zeek-config --root)/logs # ls -l total 4 drwx------. 2 root root 4096 Jun 20 21:17 2022-06-20 # cd 2022-06-20 # ls -l total 712 -rw-r--r--. 1 root root 280 Jun 20 20:17 broker.19:00:00-20:00:00.log.gz -rw-r--r--. 1 root root 24803 Jun 20 20:17 conn.19:00:00-20:00:00.log.gz -rw-r--r--. 1 root root 26036 Jun 20 21:17 conn.20:00:00-21:00:00.log.gz -rw-r--r--. 1 root root 350 Jun 20 20:17 dhcp.19:00:00-20:00:00.log.gz -rw-r--r--. 1 root root 400 Jun 20 21:17 dhcp.20:00:00-21:00:00.log.gz ...
You can adapt the log archival configuration via the following settings:
Redefine
Management::Agent::archive_logstoFto disable archival entirely.Redefine
Management::Agent::archive_intervalfor an interval other than the log rotation one.Redefine
Management::Agent::archive_dirto change the destination directory.Redefine
Management::Agent::archive_cmdto invoke an executable other than the includedzeek-archiver. The replacement should accept the same argument structure:<executable> -1 <input dir> <output dir>. The-1here refers tozeek-archiver’s one-shot processing mode.
The zeek-client CLI
Zeek ships with a command-line client for the Management framework:
zeek-client, installed alongside the other executables in the
distribution. It looks as follows:
$ zeek-client --help
usage: zeek-client [-h] [-c FILE] [--controller HOST:PORT]
                   [--set SECTION.KEY=VAL] [--quiet | --verbose] [--version]
                   {deploy,deploy-config,get-config,get-id-value,get-instances,get-nodes,monitor,restart,stage-config,show-settings,test-timeout}
                   ...

A Zeek management client

options:
  -h, --help            show this help message and exit
  -c FILE, --configfile FILE
                        Path to zeek-client config file. (Default:
                        /usr/local/zeek/etc/zeek-client.cfg)
  --controller HOST:PORT
                        Address and port of the controller, either of which
                        may be omitted (default: 127.0.0.1:2149)
  --set SECTION.KEY=VAL
                        Adjust a configuration setting. Can use repeatedly.
                        See show-settings.
  --quiet, -q           Suppress informational output to stderr.
  --verbose, -v         Increase informational output to stderr. Repeat for
                        more output (e.g. -vvv).
  --version             Show version number and exit.

commands:
  {deploy,deploy-config,get-config,get-id-value,get-instances,get-nodes,monitor,restart,stage-config,show-settings,test-timeout}
                        See `zeek-client <command> -h` for per-command usage
                        info.
    deploy              Deploy a staged cluster configuration.
    deploy-config       Upload a cluster configuration and deploy it.
    get-config          Retrieve staged or deployed cluster configuration.
    get-id-value        Show the value of a given identifier in Zeek cluster
                        nodes.
    get-instances       Show instances connected to the controller.
    get-nodes           Show active Zeek nodes at each instance.
    monitor             For troubleshooting: do nothing, just report events.
    restart             Restart cluster nodes.
    stage-config        Upload a cluster configuration for later deployment.
    show-settings       Show zeek-client's own configuration.
    test-timeout        Send timeout test event.

environment variables:

    ZEEK_CLIENT_CONFIG_FILE:      Same as `--configfile` argument, but lower precedence.
    ZEEK_CLIENT_CONFIG_SETTINGS:  Same as a space-separated series of `--set` arguments, but lower precedence.
Run commands with --help for additional details.
The majority of zeek-client’s commands send off a request to the controller,
wait for it to act on it, retrieve the response, and render it to the
console. The output is typically in JSON format, though a few commands also
support .ini output.
Looking at the Management::Controller::API module, you’ll notice
that the structure of response event arguments is fairly rigid, consisting of
one or more Management::Result records. zeek-client does not
render these directly to JSON. Instead, it translates the responses to a more
convenient JSON format reflecting specific types of requests. Several commands
share a common output format.
Standalone installation
As mentioned above, Zeek ships with zeek-client by default. Since users will
often want to use the client from machines not otherwise running Zeek, the
client is also available as a standalone Python package via pip:
$ pip install zeek-client
Users with custom Zeek builds who don’t require a Zeek-bundled zeek-client
can skip its installation by configuring their build with
--disable-zeek-client.
Compatibility
Zeek 5.2 switched client/controller communication from Broker’s native wire
format to the newer WebSocket data transport, with
zeek-client 1.2.0 being the first version to exclusively use WebSockets.
This has a few implications:
Since Broker dedicates separate ports to the respective wire formats, the controller listens on TCP port 2149 for WebSocket connections, while TCP port 2150 remains available for connections by native-Broker clients, as well as by management agents connecting to the controller.
zeek-client1.2.0 and newer default to connecting to port 2149.Controllers running Zeek older than 5.2 need tweaking to listen on a WebSocket port, for example by saying:
event zeek_init()
    {
    Broker::listen_websocket("0.0.0.0", 2149/tcp);
    }
Older clients continue to work with Zeek 5.2 and newer.
Configuration
The client features a handful of configuration settings, reported when running
zeek-client show-settings:
$ zeek-client show-settings
[client]
request_timeout_secs = 20
peer_retry_secs = 1
peering_status_attempts = 10
peering_status_retry_delay_secs = 0.5
rich_logging_format = False
pretty_json = True
verbosity = 0

[controller]
host = 127.0.0.1
port = 2150
You can override these via a configuration file, the environment variable
ZEEK_CLIENT_CONFIG_SETTINGS, and the --set command-line argument, in
order of increasing precedence. To identify a setting, use
<section>.<setting>, as shown by your client. For example, in order to
specify a controller’s location on the network, you could:
Put the following in a config file, either at its default location shown in the help output (usually
$(zeek-config --prefix)/etc/zeek-client.cfg) or one that you provide via-c/--configfile:[controller] host = mycontroller port = 21490
Set the environment:
ZEEK_CLIENT_CONFIG_SETTINGS="controller.host=mycontroller controller.port=21490"Use the
--setoption, possibly repeatedly:$ zeek-client --set controller.host=mycontroller --set controller.port=21490 ...
Other than the controller coordinates, the settings should rarely require changing. If you’re curious about their meaning, please consult the source code.
Auto-complete
On systems with an installed argcomplete
package, zeek-client features command-line auto-completion. For example:
$ zeek-client --set controller.<TAB>
controller.host=127.0.0.1  controller.port=2149
Common cluster management tasks
With a running controller and agent, it’s time start using zeek-client for
actual cluster management tasks. By default, the client will connect to a
controller running on the local system. If that doesn’t match your setting,
instruct the client to contact the controller via one of the approaches shown
earlier.
Checking connected agents
Use zeek-client get-instances to get a summary of agents currently peered
with the controller:
$ zeek-client get-instances
{
  "agent-testbox": {
    "host": "127.0.0.1"
  }
}
For agents connecting to the controller you’ll see the above output; for agents the controller connected to you’ll also see those agent’s listening ports.
Defining a cluster configuration
For zeek-client, cluster configurations are simple .ini files with two
types of sections: the special instances section defines the instances
involved in the cluster, represented by their agents. All other sections in the
file name individual cluster nodes and describe their roles and properties.
Here’s a full-featured configuration describing the available options, assuming a single agent running on a machine “testbox” with default settings:
# The instances section describes where you run Management agents
# and whether these agents connect to the controller, or the controller
# connects to them. Each instance (or, equivalently, the agent running
# on it) is identified by a unique name. The names in this configuration
# must match the names the agents use in the Zeek configuration. Without
# customization, that name is "agent-<hostname>".
[instances]
# A value-less entry means this agent connects to the controller:
agent-testbox

# An entry with a value of the form "<host>:<port>" means the controller will
# connect to them.
#
# agent-testbox = 12.34.56.78:1234

# All other sections identify Zeek cluster nodes. The section name sets
# the name of the node:
[manager]

# Nodes typically state which instance they run on:
instance = agent-testbox

# Every node needs to define its role. Possible values are "manager",
# "logger", "proxy", and "worker".
role = manager

# For nodes that require a listening port (all roles but workers),
# you can choose to define a port. If you omit it, the framework will
# define ports for you. Only give a number; TCP is implied.
#
# port = 1234

# You can optionally specify explicit metrics exposition ports for each
# node. If you omit these, the framework (specifically, the controller)
# will define ports for you. Only give a number; TCP is implied.
#
# metrics_port = 9090

# You can provide additional scripts that a node should run. These scripts
# must be available on the instance. Space-separate multiple scripts.
#
# scripts = policy/tuning/json-logs policy/misc/loaded-scripts

# You can define environment variables for the node. List them as <key>=<value>,
# space-separated if you provide multiple. If the value has whitespace, say
# <key>="<the value>'
#
# env = FOO=BAR

# For workers, specify a sniffing interface as follows:
#
# interface = <name>

# To express CPU affinity, use the following:
#
# cpu_affinity = <num>

[logger]
instance = agent-testbox
role = logger

[proxy1]
instance = agent-testbox
role = proxy

[proxy2]
instance = agent-testbox
role = proxy

[worker1]
instance = agent-testbox
role = worker
interface = eth0

[worker2]
instance = agent-testbox
role = worker
interface = eth1

[worker3]
instance = agent-testbox
role = worker
interface = eth2

[worker4]
instance = agent-testbox
role = worker
interface = eth3
Simplification for instance-local deployment
In practice you can omit many of the settings. We already saw in the
Quickstart section that a configuration
deployed locally in a joint agent-controller setup need
not specify any instances at all. In that case, use of the local instance
agent-<hostname> is implied. If you use other agent naming or more complex
setups, every node needs to specify its instance.
Simplification for agent-to-controller connectivity
In setups where agents connect to the controller, you may omit the instances
section if it would merely repeat the list of instances claimed by the nodes.
Simplification for port selection
All but the worker nodes in a Zeek cluster require a listening port, and you can specify one for each node as shown in the above configuration. If you’d rather not pick ports, the controller can auto-enumerate ports for you, as follows:
The
Management::Controller::auto_assign_broker_portsBoolean, which defaults toT, controls whether port auto-enumeration is active. Redefining toFdisables the feature.Management::Controller::auto_assign_broker_start_portdefines the starting point for port enumeration. This defaults to2200/tcp.Any nodes with explicitly configured ports will keep them.
For other nodes, the controller will assign ports first to the manager, then logger(s), then proxies. Within each of those groups, it first groups nodes in the same instance (to obtain locally sequential ports), and orders these alphabetically by name before enumerating. It also avoids conflicts with configured agent and controller ports.
The controller does not verify that selected ports are in fact unclaimed. It’s up to you to ensure an available pool of unclaimed listening ports from the start port onward.
By retrieving the deployed configuration from the controller (see the next two sections) you can examine which ports the controller selected.
Configuration of the Telemetry framework
By default, the framework will enable Prometheus metrics exposition ports,
including a service discovery endpoint on the manager (refer to the
Telemetry Framework for details), and
auto-assign them for you. Specifically, the controller will enumerate ports
starting from
Management::Controller::auto_assign_metrics_start_port, which
defaults to 9000/tcp. Any ports you define manually will be preserved. To
disable metrics port auto-assignment, redefine
Management::Controller::auto_assign_metrics_ports to F.
Staging and deploying configurations
The framework structures deployment of a cluster configuration into two phases:
First, the cluster configuration is staged: the client uploads it to the controller, which validates its content, and — upon successful validation — persists this configuration to disk. Restarting the controller at this point will preserve this configuration in its staged state. Validation checks the configuration for consistency and structural errors, such as doubly defined nodes, port collisions, or inconsistent instance use. The controller only ever stores a single staged configuration.
Then, deployment applies needed finalization to the configuration (e.g. to auto-enumerate ports) and, assuming all needed instances have peered, distributes the configuration to their agents. Deployment replaces any preexisting Zeek cluster, shutting down the existing node processes. The controller also persists the deployed configuration to disk, alongside the staged one. Deployment does not need to be successful to preserve a deployed configuration: it’s the attempt to deploy that matters.
Internally, configurations bear an identifier string to allow tracking. The client selects this identifier, which comes with no further assurances — for example, identical configurations need not bear the same identifier.
To stage a configuration, use the following:
$ zeek-client stage-config cluster.cfg
{
  "errors": [],
  "results": {
    "id": "5e90197a-f850-11ec-a77f-7c10c94416bb"
  }
}
The errors array contains textual description of any validation problems
encountered, causing the client to exit with error. The reported id is the
configuration’s identifier, as set by the client.
Then, trigger deployment of the staged configuration:
$ zeek-client deploy
{
  "errors": [],
  "results": {
    "id": "5e90197a-f850-11ec-a77f-7c10c94416bb"
    "nodes": {
      "logger": {
        "instance": "agent-testbox4",
        "success": true
      },
      "manager": {
        "instance": "agent-testbox4",
        "success": true
      },
      "worker-01": {
        "instance": "agent-testbox4",
        "success": true
      },
      "worker-02": {
        "instance": "agent-testbox4",
        "success": true
      }
    }
  }
}
Success! Note the matching identifiers. The errors array covers any internal
problems, and per-node summaries report the deployment outcome. In case of
launch errors in individual nodes, stdout/stderr is captured and hopefully
provides clues. Revisiting the quickstart example, let’s introduce an error in
cluster.cfg:
[manager]
role = manager

[logger]
role = logger

[worker-01]
role = worker
interface = lo

[worker-02]
role = worker
interface = not-a-valid-interface
Since staging and deployment will frequently go hand-in-hand, the client
provides the deploy-config command to combine them into one. Let’s use it:
$ zeek-client deploy-config cluster.cfg
{
  "errors": [
    "request timed out"
  ],
  "results": {
    "id": "eed87b02-f851-11ec-80e7-7c10c94416bb",
    "nodes": {
      "logger": {
        "instance": "agent-testbox",
        "success": true
      },
      "manager": {
        "instance": "agent-testbox",
        "success": true
      },
      "worker-01": {
        "instance": "agent-testbox",
        "success": true
      },
      "worker-02": {
        "instance": "agent-testbox",
        "stderr": "fatal error: problem with interface not-a-valid-interface (pcap_error: No such device exists (pcap_activate))",
        "stdout": "",
        "success": false
      }
    }
  }
}
The client exits with error, the timeout error refers to the fact that one of
the launch commands timed out, and worker-02’s stderr shows the problem. The
Supervisor will continue to try to launch the node with ever-increasing
reattempt delays, and keep failing.
Retrieving configurations
The client’s get-config command lets you retrieve staged and deployed
configurations from the controller, in JSON or .ini form. This is helpful for
examining the differences between the two. Following the successful deployment
shown above, we have:
$ zeek-client get-config
[instances]
agent-testbox

[logger]
instance = agent-testbox
role = LOGGER

[manager]
instance = agent-testbox
role = MANAGER

[worker-01]
instance = agent-testbox
role = WORKER
interface = lo

[worker-02]
instance = agent-testbox
role = WORKER
interface = eth0
You can see here how the client’s instance-local simplification filled in instances under the hood.
The .ini output is reusable as deployable configuration. The same
configuration is available in JSON, showing more detail:
$ zeek-client get-config --as-json
{
  "id": "5e90197a-f850-11ec-a77f-7c10c94416bb",
  "instances": [
    {
      "name": "agent-testbox"
    }
  ],
  "nodes": [
    {
      "cpu_affinity": null,
      "env": {},
      "instance": "agent-testbox",
      "interface": null,
      "name": "logger",
      "options": null,
      "port": null,
      "role": "LOGGER",
      "scripts": null
    },
    {
      "cpu_affinity": null,
      "env": {},
      "instance": "agent-testbox",
      "interface": null,
      "name": "manager",
      "options": null,
      "port": null,
      "role": "MANAGER",
      "scripts": null
    },
    {
      "cpu_affinity": null,
      "env": {},
      "instance": "agent-testbox",
      "interface": "lo",
      "name": "worker-01",
      "options": null,
      "port": null,
      "role": "WORKER",
      "scripts": null
    },
    {
      "cpu_affinity": null,
      "env": {},
      "instance": "agent-testbox",
      "interface": "eth0",
      "name": "worker-02",
      "options": null,
      "port": null,
      "role": "WORKER",
      "scripts": null
    }
  ]
}
Finally, you can also retrieve the deployed configuration (in either format):
$ zeek-client get-config --deployed
[instances]
agent-testbox

[logger]
instance = agent-testbox
role = LOGGER
port = 2201

[manager]
instance = agent-testbox
role = MANAGER
port = 2200

[worker-01]
instance = agent-testbox
role = WORKER
interface = lo

[worker-02]
instance = agent-testbox
role = WORKER
interface = eth0
Note the manager’s and logger’s auto-enumerated ports in this one.
Showing the current instance nodes
To see the current node status as visible to the Supervisors in each agent’s
instance, use the get-nodes command:
$ zeek-client get-nodes
{
  "errors": [],
  "results": {
    "agent-testbox": {
      "agent-testbox": {
        "cluster_role": null,
        "mgmt_role": "AGENT",
        "pid": 52076,
        "state": "RUNNING"
      },
      "controller-testbox": {
        "cluster_role": null,
        "mgmt_role": "CONTROLLER",
        "pid": 52075,
        "port": 2151,
        "state": "RUNNING"
      },
      "logger": {
        "cluster_role": "LOGGER",
        "mgmt_role": null,
        "pid": 54075,
        "port": 2201,
        "state": "RUNNING"
      },
      "manager": {
        "cluster_role": "MANAGER",
        "mgmt_role": null,
        "pid": 54073,
        "port": 2200,
        "state": "RUNNING"
      },
      "worker-01": {
        "cluster_role": "WORKER",
        "mgmt_role": null,
        "pid": 54074,
        "state": "RUNNING"
      },
      "worker-02": {
        "cluster_role": "WORKER",
        "mgmt_role": null,
        "pid": 54072,
        "state": "RUNNING"
      }
    }
  }
}
This groups nodes by instances, while also showing agents and controllers, so
agent-testbox shows up twice in the above. Nodes can be in two states,
PENDING upon launch and before the new node has checked in with the agent,
and RUNNING once that has happened. Nodes also have a role either in cluster
management (as AGENT or CONTROLLER), or in the Zeek cluster. The
information shown per node essentially reflects the framework’s
Management::NodeStatus record.
Showing current global identifier values
For troubleshooting scripts in production it can be very handy to verify the
contents of global variables in specific nodes. The client supports this via the
get-id-value command. To use it, specify the name of a global identifier, as
well as any node names from which you’d like to retrieve it. The framework
renders the value to JSON directly in the queried cluster node, side-stepping
potential serialization issues for complex types, and integrates the result in
the response:
$ zeek-client get-id-value LogAscii::use_json
{
  "errors": [],
  "results": {
    "logger": false,
    "manager": false,
    "worker-01": false,
    "worker-02": false
  }
}
$ zeek-client get-id-value Log::all_streams worker-01
{
  "errors": [],
  "results": {
    "worker-01": {
      "Broker::LOG": {
        "columns": null,
        "path": "broker",
        "policy": "Broker::log_policy"
      },
      "Cluster::LOG": {
        "columns": null,
        "path": "cluster",
        "policy": "Cluster::log_policy"
      },
      ...
      "X509::LOG": {
        "columns": null,
        "ev": "X509::log_x509",
        "path": "x509",
        "policy": "X509::log_policy"
      },
      "mysql::LOG": {
        "columns": null,
        "ev": "MySQL::log_mysql",
        "path": "mysql",
        "policy": "MySQL::log_policy"
      }
    }
  }
}
Restarting cluster nodes
The restart command allows you to restart specific cluster nodes, or the
entire cluster. Note that this refers only to the operational cluster (manager,
workers, etc) — this will not restart any agents or a co-located controller.
Here’s the current manager:
$ zeek-client get-nodes | jq '.results."agent-testbox".manager'
{
  "cluster_role": "MANAGER",
  "mgmt_role": null,
  "pid": 54073,
  "port": 2200,
  "state": "RUNNING"
}
Let’s restart it:
$ zeek-client restart manager
{
  "errors": [],
  "results": {
    "manager": true
  }
}
It’s back up and running (note the PID change):
$ zeek-client get-nodes | jq '.results."agent-testbox".manager'
{
  "cluster_role": "MANAGER",
  "mgmt_role": null,
  "pid": 68752,
  "port": 2200,
  "state": "RUNNING"
}